
Figuring out how to clean out an estate is one of those tasks most people face without any preparation. A loved one passes, and suddenly you’re standing in a home full of decades’ worth of belongings, furniture, paperwork, personal items, and everything in between. There’s no manual handed to you at the door, and the emotional weight makes every decision harder.
The process involves more than just hauling stuff out. You’ll need to navigate probate requirements, coordinate with family members, decide what to keep, donate, sell, or throw away, and do it all within a reasonable timeline. Some estates take a weekend. Others take months. The difference usually comes down to having a plan before you start pulling things off shelves.
At Dump Express, we’ve delivered dumpsters to hundreds of estate cleanouts across Cape Cod and Plymouth over the past 20 years. We’ve seen what works, what stalls people out, and where the process tends to break down. This guide walks you through the full cleanout process, from the first walkthrough to the final haul, so you can move forward with clarity and a clear path to getting it done.
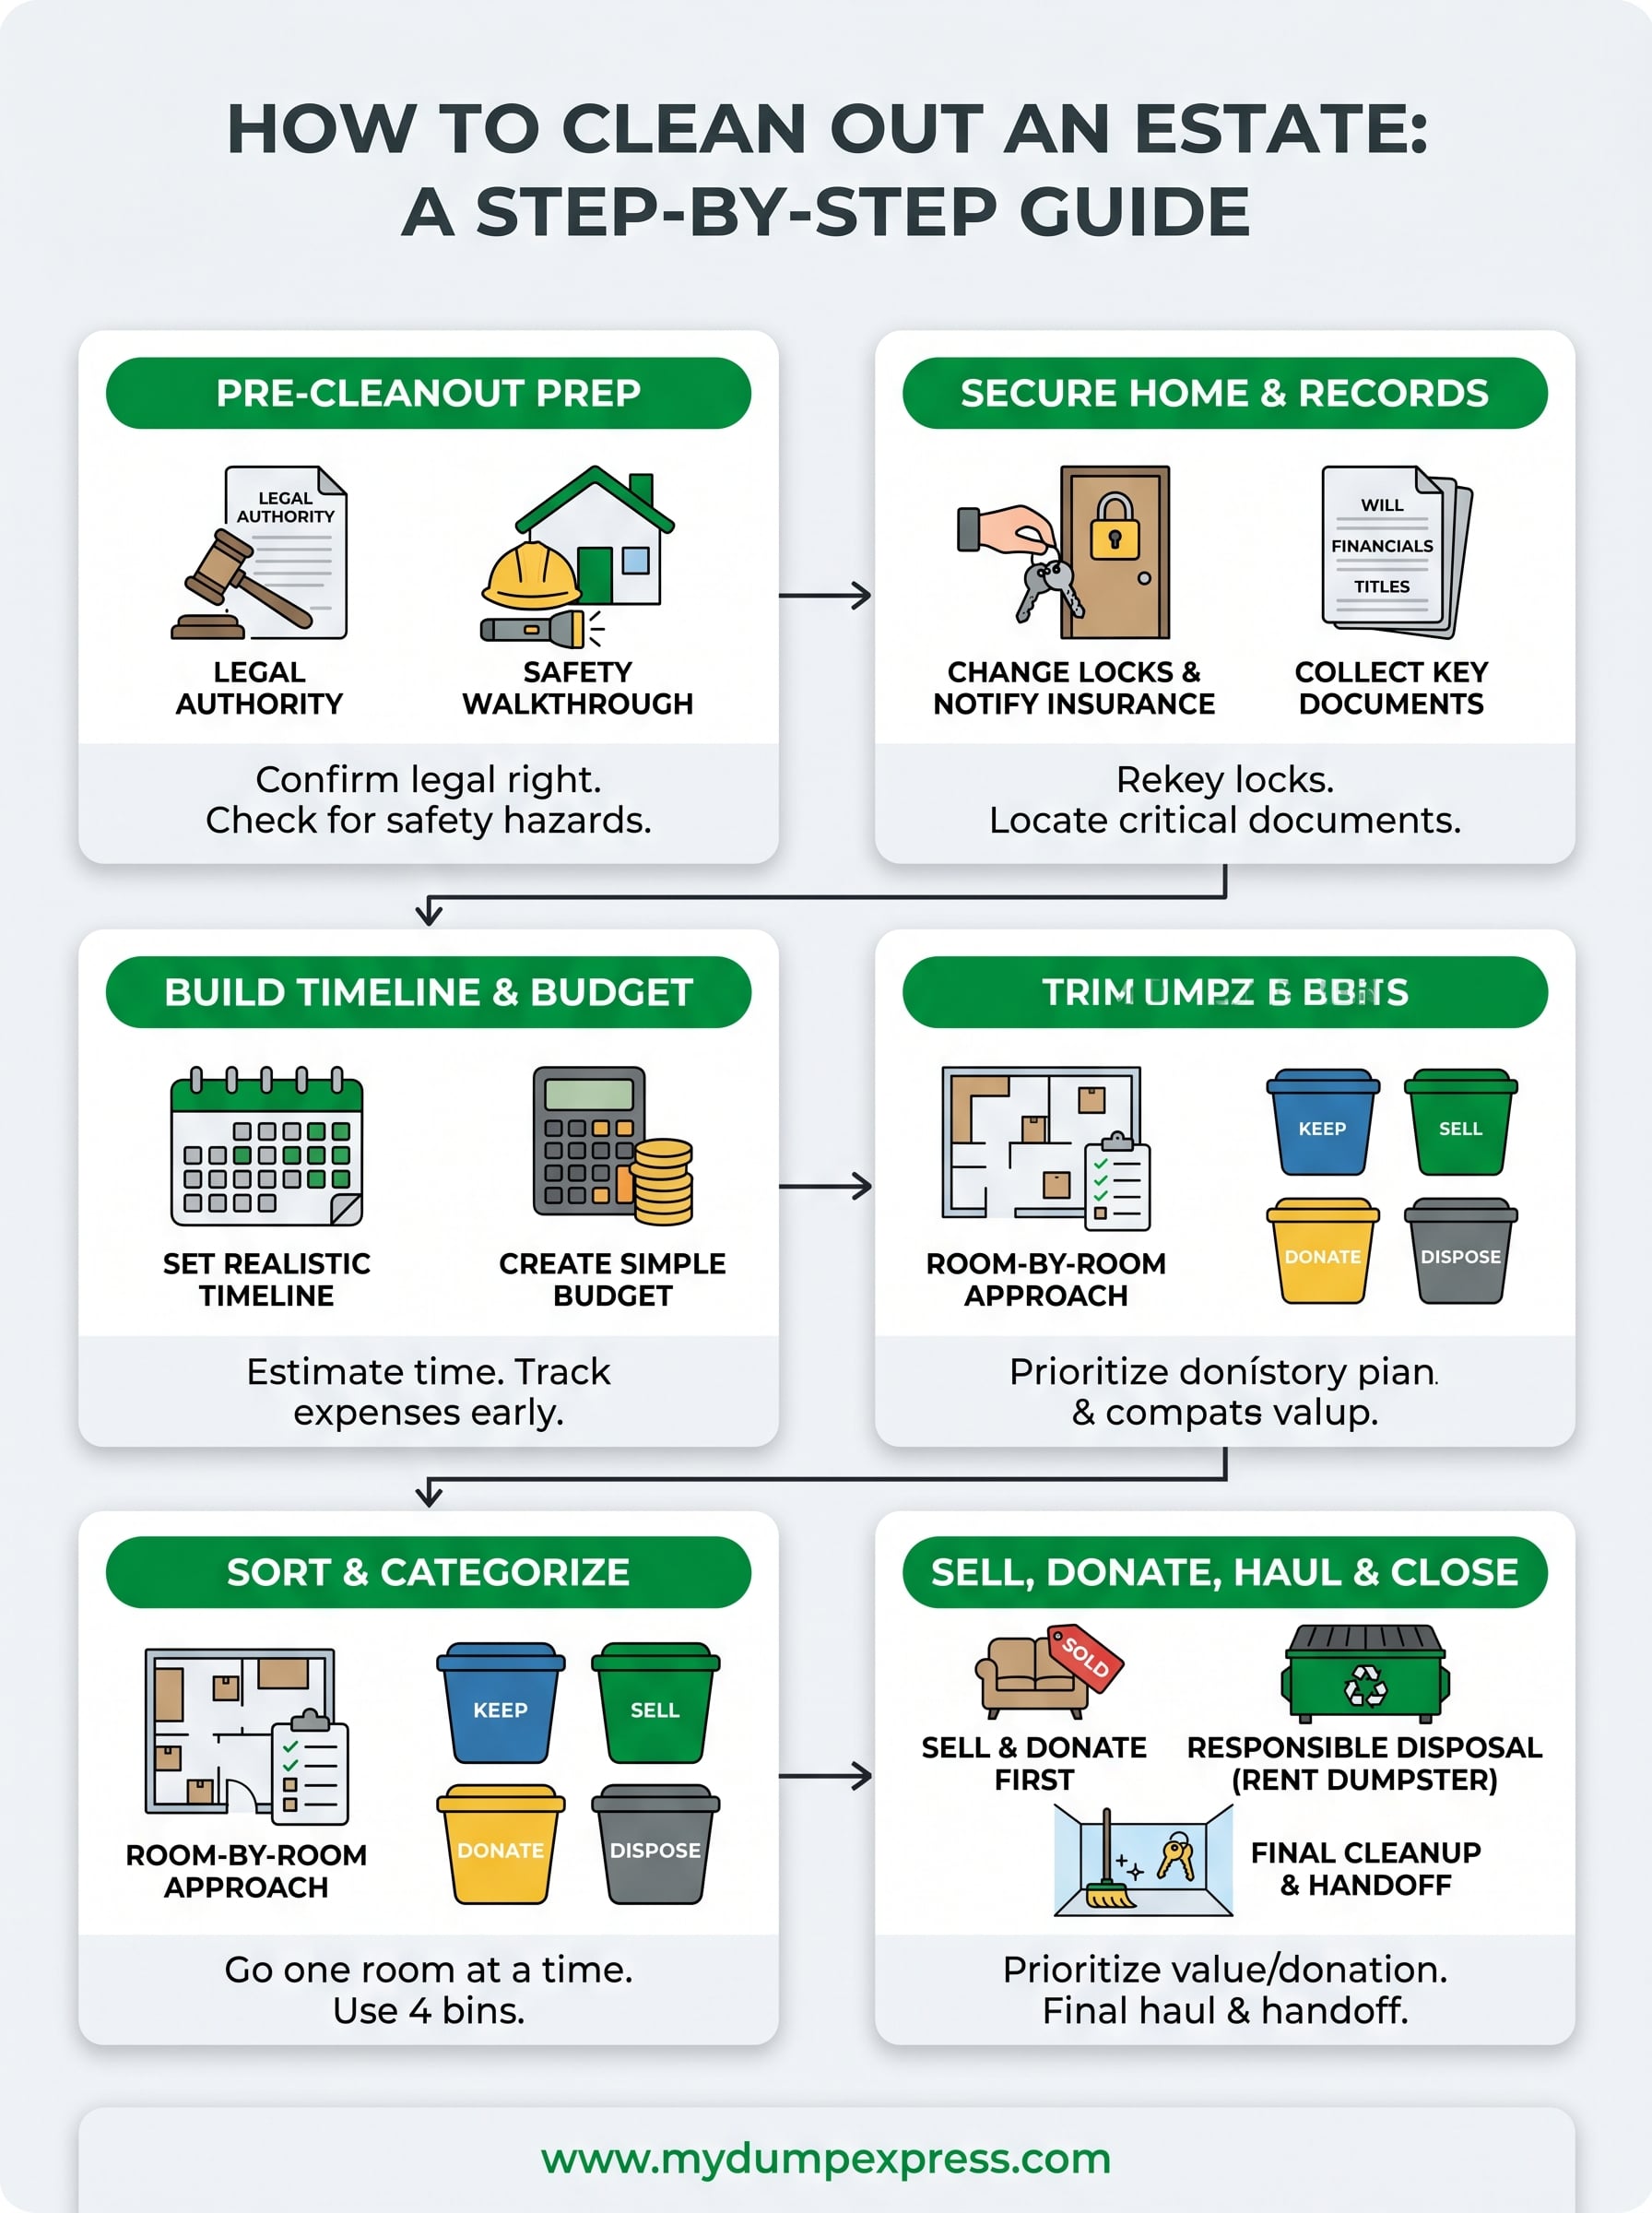
Before you start: confirm authority and stay safe
Jumping straight into sorting and hauling is the most common mistake people make when figuring out how to clean out an estate. Before you move a single piece of furniture or open a single drawer, you need to confirm two things: that you have the legal right to be there and make decisions, and that the home is physically safe to work in. Skipping either one can create serious problems down the road.
Know your legal standing before you touch anything
Your ability to manage or remove property from an estate depends entirely on your legal role in the process. If the deceased left a will, the person named as executor has the authority to manage the estate and its contents. If there is no will, a probate court typically appoints an administrator to fill that role. Either way, you need documentation before you start making decisions about what stays and what goes.
If multiple family members are involved and there’s no clear legal authority established yet, wait. Acting without confirmed authority, even with good intentions, can lead to disputes that delay the entire process and expose you to personal liability.
Start by locating the will and contacting a probate attorney if you haven’t already. Many states require an estate to go through probate before assets can be distributed or property cleared. The Massachusetts Probate and Family Court handles these filings for local properties, and working with an attorney early prevents costly missteps later. Once you have legal standing confirmed, keep a copy of that documentation with you throughout the cleanout.
Walk the property before you start any work
Before anyone picks up a box or moves a piece of furniture, do a full safety walkthrough of the home. Properties that have been unoccupied, or occupied by someone who was ill or elderly, can have conditions that are genuinely hazardous and not immediately obvious.
Check for these common issues during your walkthrough:
- Mold or water damage: look for soft floors, stained ceilings, or a musty smell, especially in basements and bathrooms
- Pest or animal activity: rodents and insects can nest quickly in undisturbed areas
- Utility status: confirm whether gas, water, and electricity are on or off, and whether any lines are compromised
- Structural concerns: uneven floors, unstable staircases, or sagging ceilings warrant a professional inspection before you move anything heavy
- Hazardous materials: older homes may contain asbestos insulation, lead paint, or mercury-containing devices that require specialized disposal
If anything raises a red flag during that walkthrough, stop and bring in a professional before you continue. Working in an unsafe space puts you and everyone helping you at risk, and unaddressed hazards can also create legal liability for the estate. A quick inspection at the start of the project costs far less than a medical bill or a legal dispute halfway through the job.
Step 1. Secure the home and gather key records
Once you have legal authority confirmed and the property is safe to enter, your next move in how to clean out an estate is to physically secure the home and collect the documents you’ll need to manage the process. Both of these tasks protect you legally and practically, and doing them early prevents problems that are much harder to resolve once the cleanout is underway.
Change access and secure the property
You don’t always know who has a key to a deceased person’s home. Neighbors, housekeepers, caregivers, or old friends may have copies they never returned. Your first action should be rekeying or replacing the locks, which puts you in full control of who enters the property going forward. This matters especially if the estate contains valuables, financial documents, or collectibles that need to stay protected throughout the process.
Changing the locks is not a sign of distrust. It is a standard step in any professional estate management process, and it protects everyone involved, including other heirs.
While you’re at the property, check that all windows and exterior doors close and latch securely. Also notify the homeowner’s insurance carrier that the property is now vacant, since most policies require this notification and failing to provide it can void your coverage during the cleanout period.
Pull together the critical documents
Gathering paperwork early keeps the cleanout moving without unnecessary stops. Work through the home systematically and collect everything that carries legal or financial relevance. Key documents to locate and secure include:
- The will and any trust documents
- Recent tax returns, bank statements, and investment account records
- Insurance policies covering home, life, auto, and health
- Vehicle titles and property deeds
- Birth certificate, Social Security card, and passport
- Outstanding bills, loan statements, and active subscription accounts
Once collected, store all documents in a single secure location off-site, such as a fireproof box at your home. You’ll reference this paperwork repeatedly during settlement, so keeping it organized from the start saves significant time later.
Step 2. Build your timeline, budget, and work plan
Before you start moving boxes, knowing when everything needs to happen and what it will cost keeps the project from running off the rails. Most people underestimate both the time and money involved in how to clean out an estate, which leads to rushed decisions and unnecessary expenses later. Spending one hour planning now saves several days of backtracking once the work begins.
Set a realistic timeline
Your timeline depends on three factors: how much is in the home, how many people are helping, and when the property needs to be cleared. A modest one-bedroom house with a single helper might take two weekends. A large home accumulated over 40 years with complex family coordination can stretch to six to eight weeks.

Use this general framework as your starting point:
| Phase | Tasks | Estimated Time |
|---|---|---|
| Week 1 | Legal review, safety check, securing property | 1-3 days |
| Week 2 | Full walkthrough, inventory, sorting plan | 1-2 days |
| Weeks 3-4 | Room-by-room sort, keep/sell/donate decisions | 3-10 days |
| Weeks 5-6 | Sales, donations, haul-out, cleaning | 3-7 days |
| Final week | Property inspection, repairs, handoff | 1-3 days |
Build in at least one buffer week. Unexpected finds, family disagreements, and scheduling conflicts almost always extend the timeline.
Build a simple budget before you spend anything
Tracking costs from day one prevents the estate from spending more than it recovers. Common expenses include dumpster rental, estate sale fees (typically 25-35% of sales), professional junk removal, cleaning services, and any necessary repairs before selling or transferring the property.
Write down your estimated costs in a simple spreadsheet using three columns: category, estimated cost, and actual cost. Update it weekly as the work progresses. This gives you a clear picture of where money is going and helps you justify decisions to other heirs if questions arise. Keeping finances transparent from the start protects everyone involved and reduces friction when it is time to settle the estate.
Step 3. Sort room by room and decide what to keep
The most overwhelming part of how to clean out an estate is standing in a full home with no system in place. Working room by room gives you clear progress markers and prevents the mental fatigue that comes from jumping between spaces. Start with the rooms most likely to contain high-value or legally relevant items, such as the primary bedroom, home office, and any dedicated storage areas.
Avoid making permanent decisions about sentimental items on your first pass. Flag them, set them aside, and revisit them once the obvious categories are handled.
Prioritize rooms strategically
Not every room carries the same weight in an estate cleanout. The primary bedroom and home office are usually where financial documents, jewelry, cash, and personal records are stored, so tackle these first. Bathrooms and kitchens can wait, since most of their contents are straightforward to sort and rarely carry significant monetary or sentimental value.
Work through one room completely before moving to the next. This prevents items from migrating between spaces and keeps your sorting process clean and trackable.
Use a four-category system for every item
Every object you pick up during the cleanout belongs in one of four categories. Applying this framework consistently across every room removes the need to make one-off judgment calls that slow the work down. Assign each item to one of the following:

| Category | What goes here |
|---|---|
| Keep | Family heirlooms, legal documents, items claimed by heirs |
| Sell | Furniture, collectibles, tools, electronics in good condition |
| Donate | Clothing, housewares, books that charities will accept |
| Dispose | Broken items, expired goods, materials with no reuse value |
Label each room with physical bins or taped floor zones so everyone helping knows exactly where to place items without stopping to ask. This keeps the work moving even when multiple people are sorting at the same time, and it cuts down on second-guessing at the end of each session.
Step 4. Sell, donate, recycle, and dispose of the rest
Once your sorting is complete, you move into the phase of how to clean out an estate that recovers the most value and clears the most space. The goal here is to work through your sell, donate, and dispose piles in the right order, since selling comes first, donated items go second, and disposal is always the last resort. Working out of sequence wastes effort and money.
Get value from items before anything goes to the curb
Start with the sell category. An estate sale company handles pricing, setup, and managing buyers, which makes sense for large volumes of furniture and collectibles. Expect to pay 25 to 35 percent of gross sales as their fee. For individual higher-value items, list them on Facebook Marketplace or bring them to a local consignment shop. For mid-range furniture and tools, a one-day estate sale often outperforms online listings in total return.
Do not price or sell items until you confirm with all heirs that no one has a claim on them. One missed conversation can undo a sale and create conflict.
Once selling wraps up, move through your donation pile. Local organizations such as Habitat for Humanity ReStores accept furniture, appliances, and building materials. Clothing and housewares go to thrift stores. Call ahead before you load a vehicle, since most organizations list their accepted items online and will turn away anything damaged or stained.
Dispose of what remains responsibly
After selling and donating, you’ll still have material that no one wants. Recyclables such as metal, cardboard, and electronics should go to your local transfer station or a certified e-waste recycler rather than the trash. For the bulk of what remains, renting a dumpster is the most practical and cost-effective solution.
A 10-yard or 15-yard dumpster handles most residential estate cleanouts without requiring multiple trips to a transfer station. Place it in the driveway early in the cleanout week so helpers can load directly as they sort, which cuts hours off the overall project timeline.
Finish the cleanout and close out the property
Once the last load leaves the property, do a final walkthrough before you hand over the keys. Check every room, closet, and cabinet for anything left behind. Sweep and mop each space, remove any remaining trash, and document the condition of the home with photos. This protects you if any disputes arise after the estate closes.
Knowing how to clean out an estate means following through on the administrative side too. Notify utility companies, cancel any active subscriptions tied to the address, and contact the post office to forward or hold remaining mail. Then hand the property off to a real estate agent, the next heir, or the landlord with everything documented and in order.
If you need a dumpster delivered to your Cape Cod or Plymouth property to handle the final haul, schedule your dumpster rental with Dump Express and get the job done without the back-and-forth.